The systematic offer of rapid tests for COVID-19 screening has been discontinued. Rapid tests may no longer be available at certain local points of service.
People eligible for local points of service testing for influenza-like symptoms or COVID-19 can make an
When to use a COVID-19 rapid screening test
It is recommended that you use a rapid test as soon as possible if you have COVID-19 symptoms and:
- You have never had COVID-19
- You are eligible for PaxlovidTM treatment;
- You are in contact with vulnerable people.
Anyone with COVID-19 symptoms can also use a rapid test to find out if they have COVID-19.
Shelf life (expiry date) for rapid tests
The shelf lives (expiry dates) for rapid tests have been amended by Health Canada.
- Most rapid tests can be kept and used for 24 months after their manufacturing dates.
- However, BD VeritorTM rapid tests can be kept and used for 16 months after their manufacturing dates.
- The manufacturing date is indicated on each test box next to the code MFG.
Expired rapid tests can be thrown in the garbage. The instruction sheets and cardboard boxes can be put in your recycling bin.
How to use a COVID-19 rapid screening test
Everything you need for your test is included in the test kit, except for a timer or stopwatch. Be sure to have one close at hand before starting the test. You might also need a glass if your kit does not have tube stand.

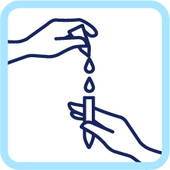
3. Put the liquid into the tube or open the tube that is prefilled with liquid.
For the PANBIO tests, add 12 drops of liquid to the tube.

4. To increase chances of detecting the virus, if you wish, rub the inside of each cheek for at least 5 seconds before taking a sample from both nostrils.

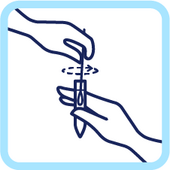
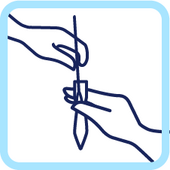
5. Insert the swab into a nostril while turning it against the lining of the nose. Repeat in the other nostril using the same swab.
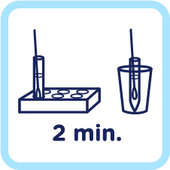


10. Wait 15 minutes. Do not touch the test device during the waiting period. Reading the test results before or after 15 minutes can give incorrect results.

11. Read the result on the device.
- Positive: The result is positive when line C and line T appear in the window. The order in which the lines appear is not important and even if a line is pale, the result indicated is accurate.
- Negative: The result is negative when only line C appears in the window.
- Invalid: The result is invalid if line C is not visible in the window.
Precautions to take
The following precautions should be taken:
- Store rapid tests at room temperature, out of direct sunlight.
- Keep rapid antigen test kits and solutions out of the reach of children and pets;
- Never swallow the solutions and avoid contact with eyes and skin. Contact the
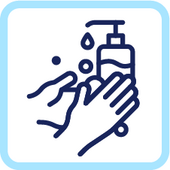
Poison Control Centre in case of accidental ingestion or direct skin exposure to the solutions in the kits; - Wash hands thoroughly after use.
Steps to take based on the results of a COVID-19 rapid screening test
If the result of a rapid screening test is positive,
- Consult a pharmacist quickly if you are eligible for PaxlovidTM treatment. Treatment may be offered to you.
- Take the necessary steps to avoid spreading the virus, particularly to the vulnerable people around you.
- Take note of the test date. This information could be useful to you when making an appointment for your next COVID-19 vaccine.
If the result is negative, perform another test 48 hours later.
Last update: October 7, 2024